Tuesday, January 24, 2012

Part-2: Text Manipulation in PowerShell using .ToLower and .ToUpper method


Part-1: http://newdelhipowershellusergroup.blogspot.com/2012/01/part-1-text-manipulation-in-powershell.html

Hi,

In part-1 of text manipulation we saw how to use .Trim(),.TrimStart() and TrimEnd() method. Today we will see how to use .ToLower and ToUpper() Method.

Lets start

we are using the same text which we used in part-1 and saving the text in a variable $text

$text = "The Quick brown fox jumps over the lazy dog"

24-01-2012 12-42-07

.ToLower()

When we use ToLower() method it convert the whole string in lowercase.

Check first what $text contains.  and it contains the text which we provide to variable $text

24-01-2012 12-44-23

When we run the $text.ToLower() it converted the whole string in to lower case.

24-01-2012 12-46-13 

Let’s compare it with original one. You can see it converted the whole string to lower case {actually “T” in “The” and “Q” in “Quick” is uppercase in original text}

24-01-2012 12-49-00

ToUpper()

The ToUpper() method convert the whole string in to uppercase.

$text.ToUpper()

You can see that the whole string in converted to UPPER CASE :)

24-01-2012 12-55-24

let compare it with our original text.

Happy????? :)

24-01-2012 12-57-17

I hope it helps someone :)

Thanks

Aman Dhally

Monday, January 23, 2012

Part-1: Text Manipulation in PowerShell using Trim, TrimStart , TrimEnd methods


Hi,

Did you ever tried to use .Trim() method on a string and can’t get it working? if yes ? Then welcome to the novice group. and if no? man you are genius.

Kidding :)

i was looking for some example for it i found few but not with screenshots :) .. then i decide to write a article on it … 

So lets start.

I am using the text “The Quick brown fox jumps over the lazy dog” and put this text in to a variable $text
$text = "    The Quick brown fox jumps over the lazy dog.     "

You can see that i have a space in the the beginning of the text and the end of the text.


23-01-2012 16-26-58

Lets remove these spaces to remove these spaces we are going to use trim() method.
Trim()

The Trim() remove the black characters to the right and left 

$text.Trim()

You can see that white space is removed from beginning of “the quick brown”

23-01-2012 16-35-10

TrimStart()

The TrimStart() remove all the chracters from the start of the string.


If you want to remove any from the beginning of the text than we need to use TrimStart() method. Lets remove “The QUick” from the text.

$text.TrimStart("The Quick")

Now you can see in the output “The QUick” is removed from output.


23-01-2012 16-40-41

not lets trim the end of the string using TrimEnd() method

TrimEnd()

The TrimEnd() remove are the characters from the string.


$text.TrimEnd("the lazy dog.     ")

You can see that now “the lazy dog.” is removed from the output.


23-01-2012 17-37-57

I hope this helps someone…


Thanks
Aman Dhally

Friday, January 20, 2012

Uninstall Software using PowerShell


Hi,

today i was trying to uninstall the the software using PowerShell.

i See few blog posts about uninstalling software using PowerShell they re recommending WMI to uninstall software using the .Uninstalled() method. But i think this method is not right because it don’t un-installed the software properly. Sometime uninstalling software using these method cause system/laptop to crash.

In my view, un-installation should be done by proper way.

Lets un-install winzip in a proper way. You can also script it.

we are going to use WMI but in another way.

Lets Start

lets see installed software first using the below command.

Get-WmiObject -Class win32_product

it is showing the list of all installed software.

 20-01-2012 17-24-32

Now see if we have winzip installed. we are piped the previous command to Where-Object and searching for name which contain winzip in it.

Get-WmiObject -Class win32_product | where { $_.Name -like "*Winzip*"}

Yes we have WinZip installed

20-01-2012 17-27-40 

Lets pipe the above command to Format-List to that we can see all the members of the Winzip.

Get-WmiObject -Class win32_product | where { $_.Name -like "*Winzip*"} | format-List *

This will give us  all the member properties of Winzip. The property in which we are interested is “LocalPackage”

20-01-2012 17-31-01

and you can see that install LocalPackage contains a path to a .msi executable file. and we can uninstall .msi files uisng MSIEXEC. lets check the which command line switches MSIEXEC support.

Simple run MSIEXEC and it will show you all the switches msiexec support.  The switch which we are going to use is /x and /passive

20-01-2012 17-38-01

lets combine the all commands together. I put the first command in to $Wzip variable.

  1. $Wzip = Get-WmiObject -Class win32_product | where { $_.Name -like "*Winzip*"}
  2. $Wzip.localPackage

Now try to run $Wzip.localPackage and this will show us the WinZip install source

20-01-2012 17-43-54 

Run the below command to uninstall the Winzip.

msiexec /x  $wzip.localpackage /passive

this will start un-installation of Winzip and will show only the Progress bar only {because we are using msiexex’s /passive switch”

Here it start uninstallation .

20-01-2012 18-05-01 

20-01-2012 18-05-38 

20-01-2012 18-05-44 

20-01-2012 18-06-37 

All done !!!! lets check Programs and features in Control Panel and winzip is not here :)

20-01-2012 18-11-05 


You are save all this in script and use it to uninstall winzip or any other software using powershell.

Hope it helps someone :)


Thanks

Aman Dhally


How to use –Exclude switch in Remove-Item cmdlet in PowerShell


Hi,
today i was trying to remove some junk folders and files in a  specific folder. But i don’t want to remove all of file and folder , i want to keep few folders. Then i think that i should use the –Exclude switch with Remove-Item Cmdlet.
I tried to use –Exclude switch but somehow i failed to get it working because i don't know the exact patter used by –Exclude switch. After few minutes of testing i get it done and i thought i should share this tip with you.
  1. $Lenovo = "D:\P-Temp\Lenovo\*"
  2. Remove-Item -Recurse  -Path $Lenovo -Exclude system,temp,updates.ser,"*.xml"   -VerboseForce
In $Lenovo variable i specified the folder path in which I want to remove the items
I want to Exclude folder name “System”,”temp” and file name “updates.ser” and all .XML Files
in -Exclude switch give the folder name which you don’t want to delete,  no need to put the in a double quotes “” in folder name . You can provide multiple folder name separated by comma.
in pattern matching make sure you put the wild cards in double quotes “”.

Lets Test it !!
see we have System,Temp, few XML and one Updates.Ser file which we exclude to deleted. lets run the script now and see which file is getting deleted.
20-01-2012 12-48-32
after running the script .
All folders are stay intact which we exclude in the Remove-Item cmdlet.
20-01-2012 12-52-56
I hope that i helps someone .
thanks
aman dhally


Monday, January 16, 2012

Alias and Powershell profiles


Hi All

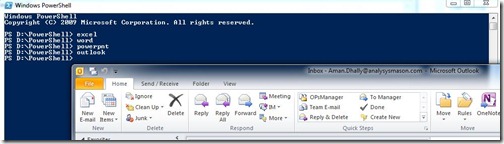
I love “RUN” box.  We can open run box “Windows Key + R” and type the Excel, Powerpoint, and click on OK and its open these application which are in the System path.

1

But if you try to run “Excel” or “Powerpoint” etc in PowerShell console they wont work.

13

Everyday i open firefox, Internet Explorer, Ms Word, Ms Excel, Ms PowerPoint from “RUN” box. but today i thought that these application must me run from my powershell console.

The benefit of this is that i don't need to open “RUN” box every time before running any command.

Windows PowerShell Profile

First we need to create a windows powershell profile. It is a simple .ps1 file which reside on your Document folder and it run before opening PowerShell console.

Now open PowerShell Console and in Console type notepad $profile

If you don’t have profile created before it ask you to create a new file. Click on Yes.

2

First i want that whenever I open “PowerShell” console it should run in “D:\PowerShell”, to achieve this we need to use Set-Location cmdlet.

Set-location D:\PowerShell

3

Now save the file and close it. and lets open PowerShell Console again.

Cool!!! now the default path of PowerShell console is set to “D:\PowerShell”

4

Aliases

Our Next Step is to setup alias. to achieve this we are using  Set-Alias .

The Syntax to setup alias is Set-Alias <Name> <Path of file >

We are setting up alias for Word,Excel,Powerpnt,Outlook,Firefox,Internet,Explorer,Chrome,

and the command should be : 

Note: I am using Office 2010 and may be your office path may be different.


Set-Alias word        'C:\Program Files\Microsoft Office\Office14\WINWORD.EXE'

Set-Alias powerpnt   'C:\Program Files\Microsoft Office\Office14\POWERPNT.EXE'

Set-Alias excel      'C:\Program Files\Microsoft Office\Office14\EXCEL.EXE'

Set-Alias outlook    'C:\Program Files\Microsoft Office\Office14\OUTLOOK.EXE'

Set-Alias firefox    'C:\Program Files\Mozilla Firefox\firefox.exe'

Set-Alias Iexplore   'C:\Program Files\Internet Explorer\iexplore.exe'

Set-Alias Chrome     'C:\Users\aman.dhally\AppData\Local\Google\Chrome\Application\chrome.exe'

now open our powershell profile again and paste the above command.

5

save the file and close it. and also close the PowerShell console and open it again.

Lets test it now

- Excel => Working

6

- Word => Working

7

- PowerPoint => Working

8

- Outlook => Working

9

Our all Ms Office applications are working .. lets test browsers now.

- Chrome => Working

10

- Firefox => Working

11

- Internet Explorer => Working

12

All is working .. u can add more alias if you want.

Thanks

Aman Dhally

Friday, January 13, 2012

7zip and PowerShell


Hi,

first of all “Happy New year” to all of you.

yesterday one of my colleague asked me to write to write a script which can zip .bak files but the zip files should be in same folder which original .bak exists.

Logic behind this is to compress .bak files {normally SQL backups} in there current folders so that they are easy to find.

after spending 2-3 hours i am successfully able to get this done.

First you can download and installs the 7zip from this link : http://www.7-zip.org/download.html

You can download the whole script from here : http://dl.dropbox.com/u/17858935/PowerShell_%26_7Zip.zip

-------------------------------------------------------------------------------------------------------------------------------------------------------------

if (-not (test-path "$env:ProgramFiles\7-Zip\7z.exe")) {throw "$env:ProgramFiles\7-Zip\7z.exe needed"}

set-alias sz "$env:ProgramFiles\7-Zip\7z.exe"

$filePath = "C:\Users\aman.dhally\Desktop\Desktop-2\ASD\Test-3"

$bak = Get-ChildItem -Recurse -Path $filePath | Where-Object { $_.Extension -eq ".bak" }

foreach ($file in $bak) {

                                  $name = $file.name

                                  $directory = $file.DirectoryName

                                  $zipfile = $name.Replace(".bak",".7z")

                                  sz a -t7z "$directory\$zipfile" "$directory\$name"    

                           }

--------------------------------------------------------------------------------------------------------------------------------------------------------------

you need to change the $filePath with your path .

You can use the same script to compress any files

Output Screenshots

1 

2 

3 

I hope it helps someone :)

Thanks

Aman Dhally


Tuesday, January 10, 2012

Creating System Footprints using PowerShell


WMI can retrieve a lot more object instances than you might think. If you submit a parent class, Get-WmiObject returns all instances of all derived classes. That's why a simple line like the following can get you all hardware-related instances:

PS> Get-WmiObject -Class CIM_PhysicalElement | Group-Object -Property __Class


Count Name                                                       Group

----- ----                                                       -----

    1 Win32_OnBoardDevice                     {\\DEMO5\root\cimv2:Win32_OnBoardDevice.Tag=...

    1 Win32_PhysicalMemoryArray  {\\DEMO5\root\cimv2:Win32_PhysicalMemoryArra...

    3 Win32_PortConnector                     {\\DEMO5\root\cimv2:Win32_PortConnector.Tag=...

    1 Win32_BaseBoard                                {\\DEMO5\root\cimv2:Win32_BaseBoard.Tag="Bas...

    1 Win32_SystemSlot                             {\\DEMO5\root\cimv2:Win32_SystemSlot.Tag="Sy...

    2 Win32_PhysicalMemory                  {\\DEMO5\root\cimv2:Win32_PhysicalMemory.Tag...

    1 Win32_SystemEnclosure               {\\DEMO5\root\cimv2:Win32_SystemEnclosure.Ta...

    4 Win32_PhysicalMedia                    {\\DEMO5\root\cimv2:Win32_PhysicalMedia.Tag=...

You can turn this into a lookup tool. Here's how:

PS> $col1 = @{Name='Key'; Expression={ ($_.__Class.ToString() -split '_')[-1] }}

PS> $info = Get-WmiObject -Class CIM_PhysicalElement | Select-Object *, $col1 | Group-Object -Property Key -AsHashTable -AsString

Use it like this:

PS> $info


Name                                                Value

----                                                -----

SystemEnclosure                 {@{Tag=System Enclosure 0; Status=; Name=Syst...

OnBoardDevice                      {@{Status=; Description=HD-Audio; __GENUS=2; ...

PhysicalMemory                    {@{__GENUS=2; __CLASS=Win32_PhysicalMemory; _...

PhysicalMedia                      {@{__GENUS=2; __CLASS=Win32_PhysicalMedia; __...

SystemSlot                              {@{Status=Unknown; SlotDesignation=PCI Expres...

BaseBoard                                 {@{Status=OK; Name=Base Board; PoweredOn=True...

PortConnector                      {@{Status=; Name=Port Connector; ExternalRefe...

PhysicalMemoryArray      {@{Status=; Name=Physical Memory Array; Repla...

PS> $info.baseboard

(...)

PS> $info.OnboardDevice

(...)

PS> $info.PhysicalMemory

(...)